How To: Configure ADFS on Windows Server 2016
The installation and configuration of the ADFS service are on the sole behalf of the customers and not Picturepark related. Before the configuration of the Identity Provider in Picturepark ADFS must be properly installed and configured.
Check Microsoft Docs for details: https://docs.microsoft.com/en-us/windows-server/identity/active-directory-federation-services
Here you find an overview of a generic setup for ADFS on Windows Server 2016.
Client ID displayed at 0:20.
There is a Microsoft limitation for ADFS 2.0 which prevents using Domain Local Groups in a claim. Choose global or universal groups. More details on this limitation on Microsoft.com
For nested groups, child groups cannot access Picturepark, if the parent group is not allowed to access Picturepark.
Basic Configuration ADFS
On Windows Server 2016, open ADFS Management.
Right-click on Application Groups and select Add Application Group.
On the Application Group Wizard, type a name and under Client-Server applications select the Web browser accessing a web application template. Then click Next.
Copy the Client Identifier value. It will be used later in the identity server configuration.
Enter the Identity Server URL as your Redirect URI (e.g. check your Picturepark Help > System Information). This is the URL where your authenticated users are redirected, which is the identity server URL.
Click Next on the "Apply Access Control Policy" page.
On the Summary screen, click Next.
On the Complete screen, click Close.
Claims Configuration ADFS
Now, on the right-click the new Application Group and select Properties.
Double-click on "web application".
To configure claims go to the Issuance Transform Rules tab.
Click on "Add Rule" and select "Send LDAP Attributes as Claims" as a rule template, then click Next.
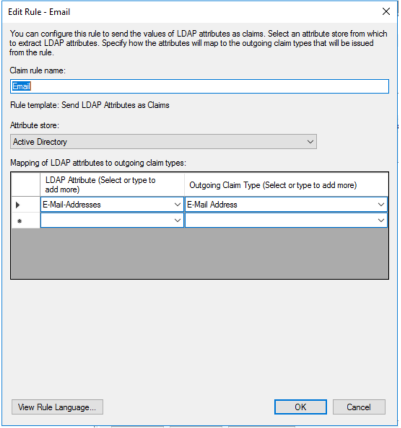
To propagate email address, configure a rule as in the picture:

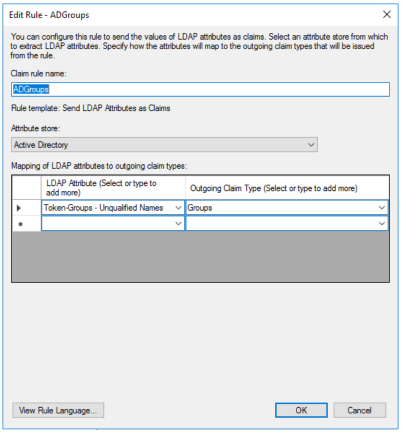
To propagate AD groups, configure a rule as in the picture:

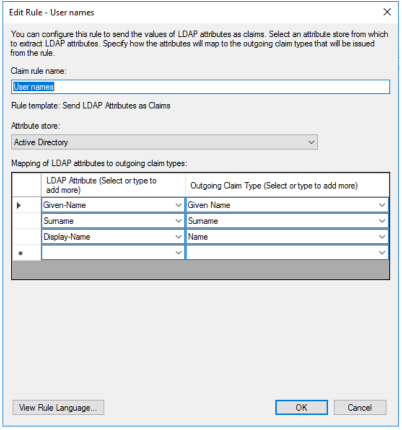
To propagate user name information, configure a rule as in the picture:

